Managing the Kubernetes cluster is very simple if you use the right toolsets. Argo CD is one of the popular tools to manage the Kubernetes clusters in a declarative way. It’s a GitOps continuous delivery tool for Kubernetes. Argo CD helps to manage Application definitions, configurations, and environments in a declarative fashion and version controlled using git. Git repository going to remain a single source of truth for your cluster configuration and container deployments. This article will help to install and configure Argo CD. In the end, we will deploy the Nginx application using Argo CD for testing.
Argo CD is implemented as a Kubernetes controller which continuously monitors running applications in Kubernetes and compares the current, live state against the desired target state (as specified in the Git repo – YAML files). A deployed application whose live state deviates from the target state is considered out of sync. Argo CD reports and visualizes the differences while providing facilities to automatically or manually sync the live state back to the desired target state. Any modifications made to the desired target state in the Git repo can be automatically applied and reflected in the specified target environments.
RedHat will be started supporting Argo from Openshift 4.7 onwards.
Pre-requisites:
- Kubernetes Cluster
Deploying Argo CD
- Login to kubernetes cluster and ensure that you have access to admin access.
2. List the available namespaces in the Kubernetes cluster.
[root@kmaster ~]# kubectl get namespace
 NAME              STATUS   AGE
 default           Active   25h
 kube-node-lease   Active   25h
 kube-public       Active   25h
 kube-system       Active   25h
 [root@kmaster ~]#
3. Create a new namespace for Argo CD.
[root@kmaster ~]# kubectl create namespace argocd
 namespace/argocd created
 [root@kmaster ~]# kubectl get namespace argocd
 NAME     STATUS   AGE
 argocd   Active   10s
 [root@kmaster ~]#
4. Deploy Argo CD using the “kubectl” command.
[root@kmaster ~]# kubectl apply -n argocd -f https://raw.githubusercontent.com/argoproj/argo-cd/stable/manifests/install.yaml
 customresourcedefinition.apiextensions.k8s.io/applications.argoproj.io created
 customresourcedefinition.apiextensions.k8s.io/appprojects.argoproj.io created
 serviceaccount/argocd-application-controller created
 serviceaccount/argocd-dex-server created
 serviceaccount/argocd-redis created
 serviceaccount/argocd-server created
 role.rbac.authorization.k8s.io/argocd-application-controller created
 role.rbac.authorization.k8s.io/argocd-dex-server created
 role.rbac.authorization.k8s.io/argocd-redis created
 role.rbac.authorization.k8s.io/argocd-server created
 clusterrole.rbac.authorization.k8s.io/argocd-application-controller created
 clusterrole.rbac.authorization.k8s.io/argocd-server created
 rolebinding.rbac.authorization.k8s.io/argocd-application-controller created
 rolebinding.rbac.authorization.k8s.io/argocd-dex-server created
 rolebinding.rbac.authorization.k8s.io/argocd-redis created
 rolebinding.rbac.authorization.k8s.io/argocd-server created
 clusterrolebinding.rbac.authorization.k8s.io/argocd-application-controller created
 clusterrolebinding.rbac.authorization.k8s.io/argocd-server created
 configmap/argocd-cm created
 configmap/argocd-gpg-keys-cm created
 configmap/argocd-rbac-cm created
 configmap/argocd-ssh-known-hosts-cm created
 configmap/argocd-tls-certs-cm created
 secret/argocd-secret created
 service/argocd-dex-server created
 service/argocd-metrics created
 service/argocd-redis created
 service/argocd-repo-server created
 service/argocd-server created
 service/argocd-server-metrics created
 deployment.apps/argocd-dex-server created
 deployment.apps/argocd-redis created
 deployment.apps/argocd-repo-server created
 deployment.apps/argocd-server created
 statefulset.apps/argocd-application-controller created
 networkpolicy.networking.k8s.io/argocd-application-controller-network-policy created
 networkpolicy.networking.k8s.io/argocd-dex-server-network-policy created
 networkpolicy.networking.k8s.io/argocd-redis-network-policy created
 networkpolicy.networking.k8s.io/argocd-repo-server-network-policy created
 networkpolicy.networking.k8s.io/argocd-server-network-policy created
 [root@kmaster ~]#
5. List all the resources from “argocd” namespace.
[root@kmaster ~]# kubectl get all -n argocd
 NAME                                      READY   STATUS    RESTARTS   AGE
 pod/argocd-application-controller-0       1/1     Running   0          3h8m
 pod/argocd-dex-server-76ff776f97-6k9wr    1/1     Running   0          3h8m
 pod/argocd-redis-747b678f89-hjtqz         1/1     Running   0          3h8m
 pod/argocd-repo-server-6fc4456c89-5xxhg   1/1     Running   0          3h8m
 pod/argocd-server-7d57bc994b-xznhd        1/1     Running   0          3h8m
 NAME                            TYPE        CLUSTER-IP     EXTERNAL-IP   PORT(S)                      AGE
 service/argocd-dex-server       ClusterIP   10.116.0.253           5556/TCP,5557/TCP,5558/TCP   3h8m
 service/argocd-metrics          ClusterIP   10.116.8.47            8082/TCP                     3h8m
 service/argocd-redis            ClusterIP   10.116.7.176           6379/TCP                     3h8m
 service/argocd-repo-server      ClusterIP   10.116.9.70            8081/TCP,8084/TCP            3h8m
 service/argocd-server           ClusterIP   10.116.2.2             80/TCP,443/TCP               3h8m
 service/argocd-server-metrics   ClusterIP   10.116.7.205           8083/TCP                     3h8m
 NAME                                 READY   UP-TO-DATE   AVAILABLE   AGE
 deployment.apps/argocd-dex-server    1/1     1            1           3h8m
 deployment.apps/argocd-redis         1/1     1            1           3h8m
 deployment.apps/argocd-repo-server   1/1     1            1           3h8m
 deployment.apps/argocd-server        1/1     1            1           3h8m
 NAME                                            DESIRED   CURRENT   READY   AGE
 replicaset.apps/argocd-dex-server-76ff776f97    1         1         1       3h8m
 replicaset.apps/argocd-redis-747b678f89         1         1         1       3h8m
 replicaset.apps/argocd-repo-server-6fc4456c89   1         1         1       3h8m
 replicaset.apps/argocd-server-7d57bc994b        1         1         1       3h8m
 NAME                                             READY   AGE
 statefulset.apps/argocd-application-controller   1/1     3h8m
 [root@kmaster ~]#
6. By default, the Argo CD API server is not exposed with an external IP. To access the API server, Change the argocd-server service type to LoadBalancer. (On Cloud Native kubernetes deployments).
[root@kmaster ~]# kubectl patch svc argocd-server -n argocd -p '{"spec": {"type": "LoadBalancer"}}'
 service/argocd-server patched
 [root@kmaster ~]#
[root@kmaster ~]# kubectl get svc -n argocd
 NAME                    TYPE           CLUSTER-IP     EXTERNAL-IP   PORT(S)                      AGE
 argocd-dex-server       ClusterIP      10.116.0.253           5556/TCP,5557/TCP,5558/TCP   3h12m
 argocd-metrics          ClusterIP      10.116.8.47            8082/TCP                     3h12m
 argocd-redis            ClusterIP      10.116.7.176           6379/TCP                     3h12m
 argocd-repo-server      ClusterIP      10.116.9.70            8081/TCP,8084/TCP            3h12m
 argocd-server           LoadBalancer   10.116.2.2          80:32334/TCP,443:31609/TCP   3h12m
 argocd-server-metrics   ClusterIP      10.116.7.205           8083/TCP                     3h12m
 [root@kmaster ~]# kubectl get svc -n argocd
 NAME                    TYPE           CLUSTER-IP     EXTERNAL-IP     PORT(S)                      AGE
 argocd-dex-server       ClusterIP      10.116.0.253             5556/TCP,5557/TCP,5558/TCP   3h13m
 argocd-metrics          ClusterIP      10.116.8.47              8082/TCP                     3h13m
 argocd-redis            ClusterIP      10.116.7.176             6379/TCP                     3h13m
 argocd-repo-server      ClusterIP      10.116.9.70              8081/TCP,8084/TCP            3h13m
 argocd-server           LoadBalancer   10.116.2.2     34.102.80.202   80:32334/TCP,443:31609/TCP   3h13m
 argocd-server-metrics   ClusterIP      10.116.7.205             8083/TCP                     3h13m
 [root@kmaster ~]#
Here is the external IP to access the Argo CD GUI.
[root@kmaster ~]#  kubectl get svc -n argocd |grep LoadBalancer
 argocd-server           LoadBalancer   10.116.2.2     34.102.80.202   80:32334/TCP,443:31609/TCP   3h18m
 [root@kmaster ~]#
7. The initial password for the ArgoCD admin account is auto-generated. It’s stored as clear text in the field password in a secret named argocd-initial-admin-secret in your Argo CD installation namespace (argocd). You can simply retrieve this password using kubectl:
[root@kmaster ~]# kubectl -n argocd get secret argocd-initial-admin-secret -o jsonpath="{.data.password}" | base64 -d
 onwC......darPJBKp
 [root@kmaster ~]#
8. Login to GUI with username “admin” and retrieved password using kubectl.

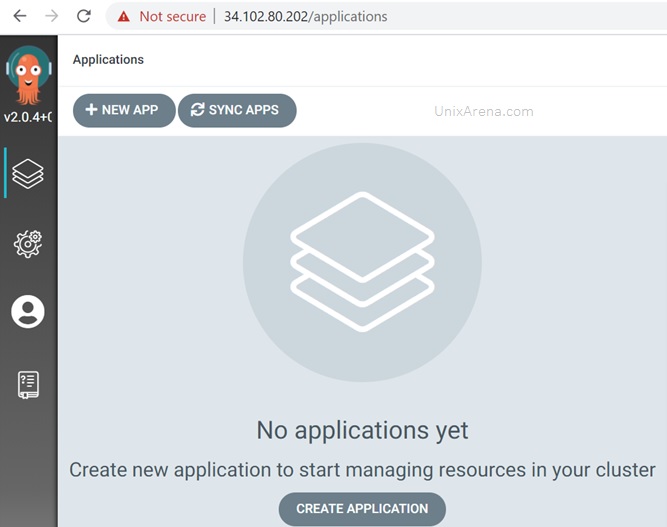
9. Here is the argo CD home page.

We have successfully deployed Argo CD in kubernetes cluster. Click on “New App” to start deploying new applications.
Deploy new application using Argo CD
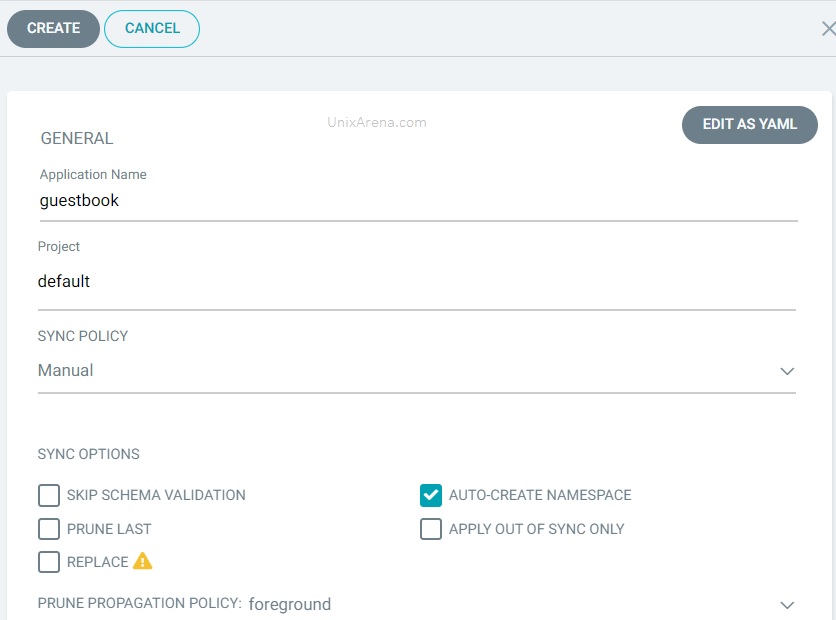
- Once you have clicked on “New App” the following window will be poping up to get the repo and project details. Click on “EDIT AS YAML” to populate values using YAML.

2. Copy & paste the following YAML codes and save.
apiVersion: argoproj.io/v1alpha1
kind: Application
metadata:
  name: guestbook
spec:
  destination:
    name: ''
    namespace: guestbook
    server: 'https://kubernetes.default.svc'
  source:
    path: helm-guestbook
    repoURL: 'https://github.com/argoproj/argocd-example-apps.git'
    targetRevision: HEAD
  project: default
  helm:
    parameters:
      - name: service.port
        value: '80'
  syncPolicy:
    syncOptions:
      - CreateNamespace=true
3. Click on create to deploy new app using argo CD.

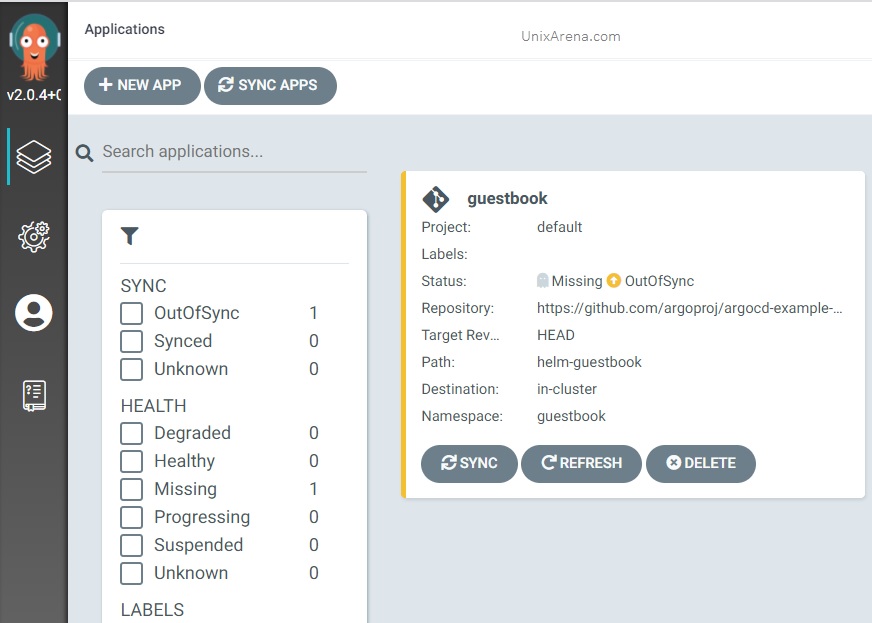
4. Since we haven’t enabled auto sync, our newly created app is showing “out of sync”. Click on “SYNC” .

5. Click on “SYNCHRONIZE” to deploy the application in to kubernetes cluster.

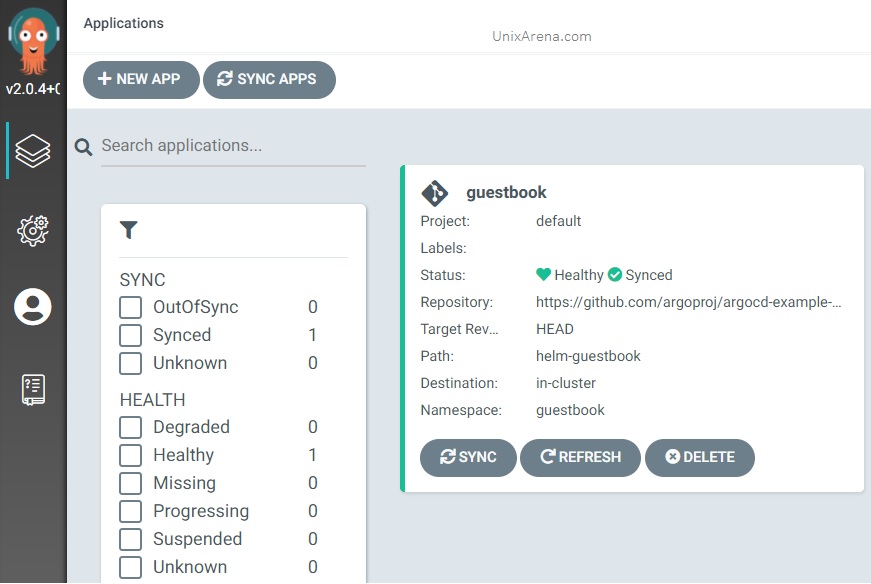
6. Once the application is synced with cluster, it will create a beautifull application tree. Click the application to view the tree.

7. Here is the application tree.

8. Here is the new deployment resources list in kubernetes.
[root@kmaster ~]# kubectl get all -n guestbook
 NAME                                            READY   STATUS    RESTARTS   AGE
 pod/guestbook-helm-guestbook-7ff45f5456-vhq56   1/1     Running   0          34m
 NAME                               TYPE        CLUSTER-IP     EXTERNAL-IP   PORT(S)   AGE
 service/guestbook-helm-guestbook   ClusterIP   10.116.1.209           80/TCP    34m
 NAME                                       READY   UP-TO-DATE   AVAILABLE   AGE
 deployment.apps/guestbook-helm-guestbook   1/1     1            1           34m
 NAME                                                  DESIRED   CURRENT   READY   AGE
 replicaset.apps/guestbook-helm-guestbook-7ff45f5456   1         1         1       34m
 [root@kmaster ~]#
We have successfully deployed argo CD and deployed new application using argo CD. Hope this article is informative to you.
Scott D says
Great article Lingeswaran. It makes the installation and configuration process very easy to follow.