

The Certified Kubernetes Security Specialist (CKS) certification is a highly regarded credential designed for professionals who want to demonstrate their expertise in securing Kubernetes environments. The certification is provided by the Cloud Native Computing Foundation (CNCF) in collaboration with The Linux Foundation.
Key Aspects of the CKS Certification:
1. Target Audience:
- Kubernetes administrators, cloud administrators, and security professionals responsible for securing Kubernetes clusters.
- Candidates should already have the Certified Kubernetes Administrator (CKA) certification, which is a prerequisite.
2. Skills Validated:
- Securing container-based applications and Kubernetes platforms.
- Implementing and configuring security in Kubernetes environments.
- Identifying and addressing security vulnerabilities.
- Adhering to security best practices in the Kubernetes ecosystem.
3. Exam Format:
- Performance-based: The CKS exam is a hands-on test where you perform tasks in a real Kubernetes environment.
- Duration: 2 hours.
- Number of Questions: The exam typically contains 15-20 questions.
- Passing Score: Around 66%.
- Validity: The certification is valid for 3 years.
4. Exam Domains:
The CKS exam is structured around several key domains:
- Cluster Setup: Securing the Kubernetes cluster, including role-based access control (RBAC), and network policies.
- Cluster Hardening: Enforcing security settings such as limiting root access, minimizing the attack surface, and using security contexts.
- System Hardening: Securing nodes and system components, leveraging tools like AppArmor or SELinux.
- Minimizing Microservice Vulnerabilities: Securing container images and ensuring secure communications between services.
- Supply Chain Security: Managing the security of the software supply chain, validating and securing images.
- Monitoring, Logging, and Runtime Security: Auditing, logging, and monitoring Kubernetes clusters, along with threat detection.
5. Preparation Resources:
- Official CNCF CKS Curriculum: The CNCF provides a detailed curriculum outlining the topics covered.
- Kubernetes Official Documentation: A key resource for understanding Kubernetes security mechanisms.
- CKS Practice Exams and Labs: Hands-on labs and scenario-based practice exams are crucial for getting familiar with real-world tasks.
- Online Courses: Providers like Udemy, Linux Academy, and A Cloud Guru offer dedicated CKS training courses.
6. Benefits:
- Recognition as a Kubernetes Security Expert: CKS is one of the few certifications focused specifically on securing Kubernetes environments.
- Career Advancement: CKS certification can help you advance in your career by showcasing specialized skills in Kubernetes security.
- Industry Demand: As container adoption grows, the need for Kubernetes security specialists is increasing, making the CKS certification valuable.
The Certified Kubernetes Security Specialist (CKS) certification is ideal for anyone looking to validate their Kubernetes security knowledge and skills. With Kubernetes becoming the de facto standard for container orchestration, this certification is increasingly in demand for professionals focused on securing modern cloud-native infrastructure.
Question 1 : RuntimeClass
Context: This cluster uses containerd as CRI runtime. Containerd default runtime handler is runc. Containerd has been prepared to support an additional runtime handler runsc(gVisor).
Tasks: Create a RuntimeClass named gvisor using the prepared runtime handler named runsc. Update all Pods in the namespace client to run on gvisor.
Solution:
You need to configure the Kubernetes cluster to use gVisor (via the runsc runtime handler) for all Pods in the client namespace by using a RuntimeClass. gVisor is a container runtime sandbox for providing an extra layer of isolation between workloads and the host kernel.
1. Create a RuntimeClass for runsc (gVisor)
To configure a RuntimeClass for using the runsc runtime handler, you can define a RuntimeClass resource. This will allow you to specify that Pods should use the runsc runtime instead of the default runc handler.
Here is the RuntimeClass YAML definition:
apiVersion: node.k8s.io/v1
kind: RuntimeClass
metadata:
  name: gvisor  # Name of the RuntimeClass
handler: runsc  # Reference to the runsc runtime handler prepared in containerd
• handler: runsc: This specifies that the runsc runtime handler should be used, which corresponds to gVisor.
• name: gvisor: This is the name of the RuntimeClass. Pods can reference this RuntimeClass by setting runtimeClassName: gvisor.
Apply this RuntimeClass configuration:
kubectl apply -f runtimeclass-gvisor.yaml
2. Update All Pods in the client Namespace to Use the gvisor RuntimeClass
To update all existing Pods in the client namespace to use gVisor, you need to modify their Pod specification to include the runtimeClassName: gvisor field.
Here’s how to modify the Pod specs in the client namespace:
apiVersion: v1
kind: Pod
metadata:
  name: my-pod
  namespace: client
spec:
  runtimeClassName: gvisor  # Use the gvisor RuntimeClass (runsc/gVisor)
  containers:
  - name: my-container
    image: nginx
3. Update existing Deployments or StatefulSets:
If you have Deployments, StatefulSets, or DaemonSets, modify their Pod templates to include the runtimeClassName: gvisor.
Example for a Deployment:
apiVersion: apps/v1
kind: Deployment
metadata:
  name: my-deployment
  namespace: client
spec:
  replicas: 3
  template:
    metadata:
      labels:
        app: my-app
    spec:
      runtimeClassName: gvisor  # Add this line
      containers:
      - name: my-container
        image: nginx
Question 2 : CIS Benchmark
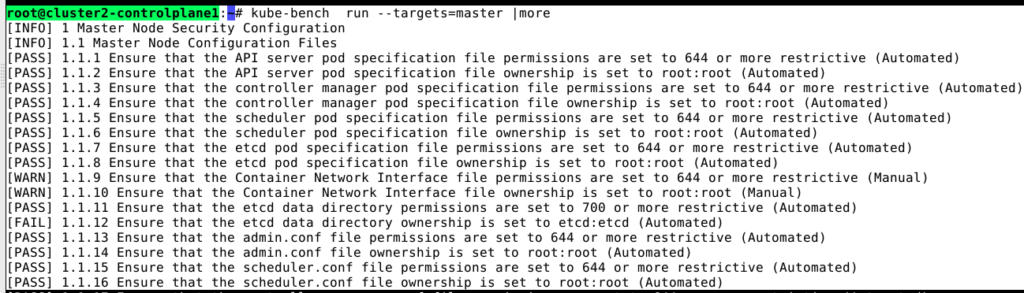
Context: CIS Benchmark tool was run against the kubeadm-created cluster and found multiple issues that must be addressed immediately.
Task: Fix all issues via configuration and restart theaffected components to ensure the new settings take effect.
Fix all of the following violations that were found against the API server:
- Ensure that the 1.2.7 –authorization-mode FAIL argument is not set to AlwaysAllow
- Ensure that the 1.2.8 –authorization-mode FAIL argument includes Node
- Ensure that the 1.2.9 –authorization-mode FAIL argument includes RBAC
Fix all of the following violations that were found against the kubelet:
- Ensure that the 4.2.1 anonymous-auth FAIL argument is set to false
- Ensure that the 4.2.2 –authorization-mode FAIL argument is not set to AlwaysAllow
Use webhook authn/authz where possible.
Fix all of the following violations that were found against etcd:
- Ensure that the 4.2.1 –client-cert-auth FAIL argument is set to true
Solution:
You need to resolve multiple security configuration issues based on the CIS Kubernetes Benchmark for the API server, Kubelet, and etcd. The issues mostly involve fixing authorization modes and ensuring authentication settings are enforced correctly.
Here are the detailed steps to fix each violation:
1. API Server Configuration Fixes
You need to modify the kube-apiserver configuration to resolve the following issues:
1. Find the kube-apiserver configuration file:
The configuration for the API server is typically located in /etc/kubernetes/manifests/kube-apiserver.yaml for kubeadm-created clusters.
2. Modify the –authorization-mode:
In the kube-apiserver.yaml, ensure that –authorization-mode is not set to AlwaysAllow. Instead, it should include Node and RBAC.
Example:
spec:
  containers:
  - command:
    - kube-apiserver
    - --authorization-mode=Node,RBAC  # Ensure Node and RBAC are included
3. Restart the API server:
After modifying the configuration, the kube-apiserver will automatically restart because it is part of the static pod in /etc/kubernetes/manifests/.
Check that the API server has restarted and is running with the correct configuration:
kubectl get pods -n kube-system | grep kube-apiserver
Validate:
You can validate the fix by running kube-bench command from the respective nodes. In the above case, its a master node. Login to master node and run kube-bench command.

2. Kubelet Configuration Fixes
You need to modify the kubelet configuration to resolve the following issues:
- Ensure that the –authorization-mode argument is not set to AlwaysAllow.
- Ensure that the –anonymous-auth argument is set to false.
Fix:
1. Find the kubelet configuration:
The kubelet configuration can be found in /var/lib/kubelet/config.yaml or /etc/systemd/system/kubelet.service.d/10-kubeadm.conf.
2. Modify the kubelet configuration:
Update the config.yaml file (or the kubelet’s command line in the systemd service) to set the following:
• Ensure anonymous authentication is disabled:
anonymous-auth: false
• Ensure –authorization-mode is not set to AlwaysAllow. It should be set to a secure mode, such as Webhook:
authorization-mode: Webhook
3. Restart the kubelet:
After making the changes, restart the kubelet service:
systemctl daemon-reload
systemctl restart kubelet
Verify that the kubelet is running with the correct settings:
kubectl get nodes
4. Re-run kube-bench command to confirm that we have addressed the given violation.
3. etcd Configuration Fix
You need to fix the etcd configuration to address the following violation:
- Ensure that the –client-cert-auth argument is set to true.
Fix:
1. Find the etcd configuration on master node.
The etcd configuration is typically found in /etc/kubernetes/manifests/etcd.yaml for kubeadm-managed clusters.
2. Modify the etcd configuration:
Ensure that –client-cert-auth is set to true in the etcd.yaml file.
Example:
spec:
  containers:
  - command:
    - etcd
    - --client-cert-auth=true
3. Restart etcd:
Since etcd is running as a static pod, it will automatically restart once the configuration is updated. Verify that etcd has restarted and is running properly:
kubectl get pods -n kube-system | grep etcd
4. Re-run kube-bench command to confirm that we have addressed the given violation.
4. Using Webhook for AuthN/AuthZ Where Possible
To ensure that both authentication and authorization are handled securely via webhooks where possible:
1. For the API Server: Ensure that the kube-apiserver is using Webhook for authentication and authorization if supported in your environment:
spec:
  containers:
  - command:
    - kube-apiserver
    - --authentication-token-webhook-config-file=/path/to/webhook-config.yaml
    - --authorization-webhook-config-file=/path/to/webhook-config.yaml
2. For the Kubelet: Ensure that –authorization-mode=Webhook is set, as mentioned earlier.
3. Re-run kube-bench command to confirm that we have addressed the given violation.
By updating the configurations for the API server, Kubelet, and etcd as described, you will address all the violations identified by the CIS Kubernetes Benchmark tool. Restarting the affected components will ensure that the new settings take effect, securing the cluster against the identified vulnerabilities.
Question 3: Service Account
Context: A Pod fails to run because of an incorrectly specified ServiceAcccount. The name of ServiceAccount must end as “-sa”. The ServiceAccount must not have access to any API credentials.
Tasks:
- Create a new ServiceAccount named backend-sa in the existing namespace prod.
- You can create pod by using manifest file /home/candidate/xxxx/pod-manifest.yaml.
- Finally, clean-up all unused ServiceAccount in namespace prod.
Solution:
The task involves creating a new ServiceAccount, ensuring it doesn’t have API access, deploying a Pod using the provided manifest, and then cleaning up any unused ServiceAccounts.
1. Create a new ServiceAccount named backend-sa in the prod namespace
The ServiceAccount needs to be named backend-sa and follow the best practice that it does not have API credentials access.
apiVersion: v1
kind: ServiceAccount
metadata:
  name: backend-sa
  namespace: prod
automountServiceAccountToken: false  # Ensures no API credentials are mounted into Pods
This will create a ServiceAccount with the following:
- Name: backend-sa
- Namespace: prod
- No API Token Access: automountServiceAccountToken: false prevents the Pod from automatically mounting a service account token, ensuring the Pod does not have Kubernetes API credentials.
Apply the ServiceAccount:
kubectl apply -f backend-sa.yaml
2. Use the Pod manifest to create the Pod
Now that the ServiceAccount is ready, you can create the Pod using the provided manifest (/home/candidate/xxxxx/pod-manifest.yaml).
Make sure the Pod manifest is updated to use the backend-sa ServiceAccount and disable API token mounting by specifying automountServiceAccountToken: false at the Pod level as well.
Example of an Updated Pod Manifest:
apiVersion: v1
kind: Pod
metadata:
  name: my-pod
  namespace: prod
spec:
  serviceAccountName: backend-sa  # Specify the service account to use
  automountServiceAccountToken: false  # Ensure no API token is mounted
  containers:
  - name: my-container
    image: nginx
Apply the Pod manifest:
kubectl apply -f /home/candidate/xxxxx/pod-manifest.yaml
3. Clean-up unused ServiceAccounts in the prod namespace
To clean up unused ServiceAccounts, follow these steps:
1. List all ServiceAccounts in the prod namespace:
kubectl get serviceaccounts -n prod
2. Identify which ServiceAccounts are not in use:
To check if a ServiceAccount is not used by any Pods, you can check for Pods that reference each ServiceAccount:
kubectl get pods -n prod -o jsonpath='{.items[*].spec.serviceAccountName}' | grep
This will help you identify ServiceAccounts that are not associated with any running Pods.
3. Delete unused ServiceAccounts:
Once you’ve identified unused ServiceAccounts, delete them:
kubectl delete serviceaccount unused-svc -n prod
Question 4: NetworkPolicy
Context: A default-deny NetworkPolicy avoids to accidentally expose a Pod in a namespace that does not have any other NetworkPolicy defined.
Task: Create a new default-deny NetworkPolicy named defaultdeny in the namespace production for all traffic of type Ingress. The new NetworkPolicy must deny all lngress traffic in the namespace production. Apply the newly created default-deny NetworkPolicy to all Pods running in namespace production.
Solution:
To create a default-deny NetworkPolicy that blocks both Ingress and Egress traffic in the production namespace, follow these steps:
1. Create the NetworkPolicy Manifest
Here is the YAML configuration for the default-deny NetworkPolicy that denies all ingress and egress traffic:
apiVersion: networking.k8s.io/v1
kind: NetworkPolicy
metadata:
  name: defaultdeny
  namespace: production
spec:
  podSelector: {}  # Apply to all pods in the namespace
  policyTypes:
    - Ingress
    - Egress
- podSelector: {}: This selects all Pods in the production namespace.
- policyTypes: Both Ingress and Egress types are specified, meaning all inbound and outbound traffic is denied unless otherwise allowed by other policies.
2. Apply the NetworkPolicy
Save the above YAML to a file, for example, defaultdeny.yaml, and apply it:
kubectl apply -f defaultdeny.yaml
This will create the NetworkPolicy in the production namespace and apply it to all Pods, denying all ingress and egress traffic unless explicitly allowed by another NetworkPolicy.
3. Verify the Policy
To verify that the policy has been applied correctly, you can check the NetworkPolicy:
kubectl get networkpolicy -n production
You should see defaultdeny listed. Additionally, to check which Pods the policy is affecting, you can inspect the Pods in the production namespace:
kubectl get pods -n production -o wide
This ensures that the policy is in place and traffic is denied by default, securing the namespace.
Question 5: RBAC
Context: A Role bound to a Pod serviceAccount grants overly permissive permissions.Complete the following tasks to reduce the set of permissions.
Task: Given an existing Pod named dev-pod running in the namespace monitoring.
- Edit the existing Role bound to the Pod.
- ServiceAccount service-account-web to only allow performing get operations, only on resources of type Pods.
- Create a new Role named role-2 in the namespace monitoring, which only allows performing update operations, only on resources of type statefulsets.
- Create a new RoleBinding named role-2-binding binding the newly created Role to the Pod ServiceAccount.
- Don not delete the existing RoleBinding.
Solution:
You are tasked with reducing the overly permissive permissions granted to a ServiceAccount used by a Pod named dev-pod in the monitoring namespace.
Here are the steps to complete each task:
Edit the Existing Role to Limit Permissions
You need to edit the existing Role that’s currently bound to the service-account-web and limit its permissions to only allow get operations on resources of type Pods.
1. Find the existing Role:
To find the Role bound to the service-account-web, you can use:
kubectl get rolebindings -n monitoring -o wide | grep service-account-web
2. Edit the Role:
Once you know the name of the Role, edit it to restrict permissions:
kubectl edit role <role-name> -n monitoring
3. Modify the Role to only allow get operations on Pods:
kubectl edit role <role-name> -n monitoring
Update the rules section of the Role to allow only get operations on Pods:
rules:
- apiGroups: [""]
  resources: ["pods"]
  verbs: ["get"]
Save the changes after editing.
2. Create a New Role for StatefulSets with Update Permissions
Next, create a new Role named role-2 in the monitoring namespace that only allows performing update operations on resources of type statefulsets.
1. Create the role-2 Role Manifest:
Here’s the YAML manifest for role-2:
kubectl create role role-2 -n monitoring --verb=update --resource=statefulsets
2. Create a RoleBinding for the Newly Created Role
Finally, create a RoleBinding named role-2-binding to bind the newly created role-2 to the service-account-web ServiceAccount.
1. Create the RoleBinding Manifest:
Here is the YAML manifest for the RoleBinding:
kubectl create rolebinding role-2-binding -n monitoring --role=role-2 --serviceaccount=monitoring:service-account-web
1. Verify the updated Role:
kubectl describe role -n monitoring
2. Verify the new Role and RoleBinding:
kubectl get roles -n monitoring
kubectl get rolebindings -n monitoring
Question 6: Logging
Task: Enable audit logs in the cluster.
To do so, enable the log backend, and ensure that:
- logs are stored at /var/log/kubernetes/audit-logs.txt
- log files are retained for 30 days
- at maximum, a number of 10 auditlog files are retained
A basic policy will be provided in manifest. It only specifies what not to log. The base policy is located on the cluster master node.
Edit and extend the basic policy to log:
- Cronjobs changes at RequestResponse level
- the request body of persistentvolumes changes in the namespace front-apps
- ConfigMap and Secret changes in all namespaces at the Metadata level
- Also, add a catch-all rule to log all other requests at the Metadata level. Do not forget to apply the modified policy.
Solution:
To enable and configure audit logging in the cluster according to your requirements, follow these steps:
- Kubernetes documentation search keyword: “audit logging”.
- Documentation link: https://kubernetes.io/docs/tasks/debug/debug-cluster/audit/
1. Edit and Extend the Audit Policy
The base audit policy is provided at /etc/kubernetes/logpolicy/sample-policy.yaml. You need to modify this file to include the additional logging rules you specified.
1. Edit the audit policy file:
Open the audit policy file for editing:
sudo vi /etc/kubernetes/logpolicy/sample-policy.yaml
2. Extend the audit policy with the required rules:
Add the following rules to the policy:
$ vim /etc/kubernetes/logpolicy/sample-policy.yaml
apiVersion: audit.k8s.io/v1
kind: Policy
# Don't generate audit events for all requests in RequestReceived stage.
omitStages:
  - "RequestReceived"
rules:
  # Log pod changes at RequestResponse level
  - level: RequestResponse
    resources:
    - group: ""
      resources: ["cronjobs"]
  # Log the request body of configmap changes in kube-system.
  - level: Request
    resources:
    - group: ""
      resources: ["persistentvolumes"]
    namespaces: ["front-apps"]
  # Log configmap and secret changes in all other namespaces at the Metadata level.
  - level: Metadata
    resources:
    - group: ""
      resources: ["secrets", "configmaps"]
  # A catch-all rule to log all other requests at the Metadata level.
  - level: Metadata
    omitStages:
      - "RequestReceived"
- CronJob logging: Logs any changes to CronJobs at the RequestResponse level.
- PersistentVolume logging: Logs PersistentVolume changes at the Request level but only in the front-apps namespace.
- ConfigMap and Secret logging: Logs any changes to ConfigMaps and Secrets at the Metadata level across all namespaces.
- Catch-all rule: Logs all other requests at the Metadata level unless they are filtered by another rule.
- Save and exit the file.
2. Enable the Log Backend
You will need to update the kube-apiserver configuration to enable audit logging with the log backend.
1. Edit the kube-apiserver configuration:
The kube-apiserver manifest file is typically located in /etc/kubernetes/manifests/kube-apiserver.yaml. You’ll need to modify this file to enable the audit log backend.
Add the following flags to the kube-apiserver under the command section:
- --audit-policy-file=/etc/kubernetes/logpolicy/sample-policy.yaml  # Path to the audit policy
- --audit-log-path=/var/log/kubernetes/audit-logs.txt               # Path to store audit logs
- --audit-log-maxage=30                                             # Retain logs for 30 days
- --audit-log-maxbackup=10                                          # Retain maximum 10 log files
- --audit-log-maxsize=100                                           # Optional: Max size for a log file in MB
Save the changes. The kube-apiserver will automatically restart and pick up the new audit log settings.
3. Apply the Modified Audit Policy
To apply the modified audit policy, ensure that the kube-apiserver has been restarted and is running with the updated configuration.
$ systemctl restart kubelet
You can check the logs for the kube-apiserver to ensure that it’s working as expected.
1. Verify that audit logs are being created:
Check if audit logs are being written to /var/log/kubernetes/audit-logs.txt:
sudo tail -f /var/log/kubernetes/audit-logs.txt
You should see audit logs being generated according to the policy defined in sample-policy.yaml.
Question 7: Secret
Task: Retrieve the content of the existing secret named db1-test in the namespace monitoring.
Store the username field in a file named /home/user.txt , and the password field in a file named /home/old-password.txt. You must create both files; they do not exist yet.
Do not use/modify the created files in the following steps, create new temporary files if needed. Create a new secret named dev-mark in the namespace monitoring, with the following content:
username : prod1
password : abcedsasa
Finally, create a new Pod that has access to the secret dev-mark via a volume:
pod name        secret-pod
namespace       monitoring
container name  test-secret-container
image           redis
volume name     secret-volume
mount path      /etc/test-secret
Solution:
Task Breakdown
You are tasked with:
- Retrieving and extracting the content from an existing Secret.
- Creating a new Secret in the monitoring namespace.
- Creating a new Pod that mounts the Secret via a volume.
Reference: https://kubernetes.io/docs/concepts/configuration/secret/
1. Retrieve the Content of the Existing Secret db1-test
To retrieve the content of the Secret db1-test in the monitoring namespace and store the username and password fields into separate files:
1. Get the Secret:
Use the kubectl get secret command to extract the Secret in a readable format (base64 decoding):
kubectl get secret db1-test -n monitoring -o jsonpath='{.data.username}' | base64 --decode > /home/user.txt
kubectl get secret db1-test -n monitoring -o jsonpath='{.data.password}' | base64 --decode > /home/old-password.txt
This will:
- Extract the username field and store it in /home/user.txt.
- Extract the password field and store it in /home/old-password.txt.
2. Create a New Secret dev-mark
Next, create a new Secret named dev-mark in the monitoring namespace with the specified username and password.
1. Create the Secret:
Use the kubectl create secret generic command to create the Secret:
kubectl create secret generic dev-mark -n monitoring \
--from-literal=username=prod1 \
--from-literal=password=abcedsasa
This command will create a new Secret with the provided username and password.
3. Create a Pod with Secret Volume Mount
Now, create a Pod named secret-pod in the monitoring namespace that mounts the dev-mark Secret as a volume.
1. Pod Manifest for secret-pod:
Create the Pod manifest with the necessary configurations:
apiVersion: v1
kind: Pod
metadata:
  name: secret-pod
  namespace: monitoring
spec:
  containers:
  - name: test-secret-container
    image: redis
    volumeMounts:
    - name: secret-volume
      mountPath: /etc/test-secret
      readOnly: true
  volumes:
  - name: secret-volume
    secret:
      secretName: dev-mark
2. Apply the Pod Manifest:
Save the above YAML as secret-pod.yaml and apply it:
kubectl apply -f secret-pod.yaml
This creates a Pod that mounts the dev-mark Secret to /etc/test-secret inside the container as a read-only volume.
4. Verify the Pod and Volume
To verify the Pod and ensure that the Secret is properly mounted:
1. Check the Pod:
kubectl get pod secret-pod -n monitoring
2. Exec into the Pod and check the mounted Secret:
You can check the contents of the mounted Secret inside the Pod by running:
kubectl exec -it secret-pod -n monitoring -- ls /etc/test-secret
You should see two files, username and password. You can view their contents by running:
kubectl exec -it secret-pod -n monitoring -- cat /etc/test-secret/username
kubectl exec -it secret-pod -n monitoring -- cat /etc/test-secret/password
Question 8: Dockerfile
Task 1 : Analyze and edit the given Dockerfile (based on the ubuntu:16.04 image) /home/candidate/test/Dockerfile fixing two instructions present in the file being prominent security/best-practice issues.
Task 2: Analyze and edit the given manifest file /home/candidate/test/deployment.yaml fixing two fields present in the file being prominent security/best-practice issues. You can use normal user(nobody),ID is 65535.
Solution:
1. Analyzing and Fixing the Dockerfile
Run as non-root user: Add the USER directive to switch to a non-root user (nobody with ID 65535).
$ vim /home/candidate/test/Dockerfile
USER nobody
USER nobody
2. Analyzing and Fixing the deployment.yaml
In Kubernetes deployments, the most common security issues revolve around:
- Running containers with root privileges: By default, containers may run as the root user, which is a security risk.
- Setting resource limits: It is best practice to define resource limits to avoid overconsumption of resources by a misbehaving container.
Reference:
Kubernetes documentation search string: “Security context”
Example:
apiVersion: apps/v1
kind: Deployment
metadata:
  name: my-app
  namespace: default
spec:
  replicas: 2
  selector:
    matchLabels:
      app: my-app
  template:
    metadata:
      labels:
        app: my-app
    spec:
      containers:
      - name: app-container
        image: my-app:1.0
        ports:
        - containerPort: 8080
        securityContext:
          runAsUser: 65535      # Run as 'nobody' user
          runAsGroup: 65535     # Use 'nobody' group
          allowPrivilegeEscalation: false # Prevent privilege escalation
        resources:
          limits:
            memory: "512Mi"
            cpu: "500m"
          requests:
            memory: "256Mi"
            cpu: "250m"
Question 9: Stateless & Immutable
Context: It is best-practice to design containers to best stateless and immutable.
Task: Inspect Pods running in namespace development and delete any Pod that is either not stateless or not immutable.
Using the following strict interpretation of stateless and immutable:
- Pods being able to store data inside containers must be treated as not stateless.
- You do not have to worry whether data is actually stored inside containers or not already.
- Pods being configured to be privileged in any way must be treated as potentially not stateless and not immutable.
Solution:
To address the task, the steps involve inspecting Pods in the development namespace and checking for the following criteria:
- Pods that store data inside containers (indicating they are not stateless).
- Pods configured with privileged mode (indicating they are not immutable).
Any Pod violating these conditions should be deleted.
1. Inspect all Pods in the development namespace:
First, list all Pods running in the development namespace:
kubectl get pods -n development
2. Inspect Pods for data storage inside containers:
Pods that use emptyDir volumes, hostPath volumes, or other volume types that are mounted inside the container can store data, meaning they are not stateless.
You can inspect each Pod’s manifest to check for volumes:
kubectl get pod <pod-name> -n development -o yaml
Look for entries under volumes that indicate mounted volumes inside the containers.
Example (a pod with emptyDir volume):
volumes:
- name: temp-storage
  emptyDir: {}
3. Inspect Pods for privileged configurations:
Pods configured with elevated privileges (e.g., privileged containers or containers running as root) should be treated as not immutable.
Check the Pod’s manifest for securityContext settings under each container:
kubectl get pod -n development -o yaml
Look for these fields:
- ‘privileged: true’ under the container’s securityContext.
- ‘allowPrivilegeEscalation: true’ under the container’s securityContext.
- ‘runAsUser: 0’ (indicating the container runs as the root user).
Example:
securityContext:
  privileged: true
securityContext:
  allowPrivilegeEscalation: true
4. Delete Pods that are not stateless or immutable:
For each Pod that is either not stateless or not immutable based on the checks above, delete them:
kubectl delete pod <pod-name> -n development
If it’s a deployment, it will automatically spin up a new pod. You need to scale down the replicas to 0.
kubectl scale deploy deployment_name --replicas=0 -n deployment
Question 10: NetworkPolicy
Task: Create a NetworkPolicy named pod-restriction to restrict access to Pod products-service running in namespace development.
Only allow the following Pods to connect to Pod products-service :
- Pods in the namespace qa
- Pods with label environment: staging, in any namespace. Make sure to apply the NetworkPolicy.
Solution:
To accomplish this task, you need to create a NetworkPolicy named pod-restriction in the development namespace, which restricts access to the Pod products-service. The policy will:
- Only allow Pods from the qa namespace to access products-service.
- Only allow Pods with the label environment: staging from any namespace to access products-service.
- Reference documentation: https://kubernetes.io/docs/concepts/services-networking/network-policies/
- Search keyword: “Network policy”
Here’s how you can create the NetworkPolicy:
1. Create a NetworkPolicy YAML File:
The NetworkPolicy will restrict access to the products-service Pod by specifying rules based on the namespace and pod labels.
apiVersion: networking.k8s.io/v1
kind: NetworkPolicy
metadata:
  name: pod-restriction
  namespace: development
spec:
  podSelector:
    matchLabels:
      app: products-service  # Target pod to apply the policy on
  policyTypes:
  - Ingress
  ingress:
  - from:
    - namespaceSelector:
        matchLabels:
          name: qa              # Allow pods from the 'qa' namespace
    - podSelector:
        matchLabels:
          environment: staging  # Allow pods with label 'environment: staging' from any namespace
Explanation:
	1. metadata:
	      •	The name field defines the name of the NetworkPolicy (pod-restriction).
	      •	The namespace is set to development to apply the policy in this namespace.
	2. spec:
	      •	podSelector: This matches the target Pod (products-service) by using the label app: products-service.
	      •	policyTypes: The Ingress type indicates this policy controls incoming traffic to the selected Pods.
	      •	ingress:
	      •	namespaceSelector: Allows traffic from Pods in the qa namespace.
	      •	podSelector: Allows traffic from Pods with the label environment: staging in any namespace.
2. Apply the NetworkPolicy:
Save the above YAML content to a file, e.g., pod-restriction.yaml, and apply it using kubectl:
kubectl apply -f pod-restriction.yaml
3. Verify the NetworkPolicy:
To verify that the NetworkPolicy is applied correctly:
kubectl describe networkpolicy pod-restriction -n development
This NetworkPolicy ensures that only Pods from the qa namespace and Pods with the label environment: staging in any namespace can access the products-service Pod in the development namespace.
Question 11: ImagePolicyWebhook
Context: A container image scanner is set up on the cluster, but it is not yet fully integrated into the cluster configuration. When complete, the container image scanner shall scan for and reject the use of vulnerable images.
Task: You have to complete the entire task on the cluster master node, where all services and files have been prepared and placed. Given an incomplete configuration in directory /etc/kubernetes/epconfig and a functional container image scanner with HTTPS endpoint http://wakanda.local:8082/image_policy:
- Enable the necessary plugins to create an image policy
- Validate the control configuration and change it to an implicit deny
- Edit the configuration to point t the provided HTTPS endpoint correctly.
Finally , test if the configuration is working by trying to deploy the vulnerable resource /root/test/configuration-test.yaml. You can find the container image scanner log file at /var/log/imagepolicy/acme.log
Solution:
To complete the task of integrating the container image scanner with the Kubernetes cluster, we need to:
- Enable the necessary Kubernetes admission plugins to enforce image policies.
- Validate the configuration and set an implicit deny policy.
- Edit the configuration to point to the provided HTTPS endpoint for the container image scanner.
- Test the setup by attempting to deploy a vulnerable resource and checking the logs.
1. In the directory /etc/kubernetes/epconfig, there should be a configuration file related to the image policy webhook. We need to modify this file to configure the image policy correctly.
$ ssh kmaster1
$ vim /etc/kubernetes/epconfig/admission_configuration.json
'defaultAllow': false #false
Update the config file on the epconfig directory.
$ vim /etc/kubernetes/epconfig/kubeconfig.yaml
apiVersion: v1
kind: Config
clusters:
- cluster:
 certificate-authority: /etc/kubernetes/pki/server.crt
 #server URL
 server: https://wakanda.local:8082/image_policy
...
#Volume Mountpath
  - mountPath: /etc/kubernetes/epconfig
    name: epconfig
hostNetwork: true
...
#Volume
volumes:
- name: epconfig
  hostPath:
    path: /etc/kubernetes/epconfig
2. Update kube-api server.
$ vim /etc/kubernetes/manifests/kube-apiserver.yaml
- --enable-admission-plugins=NodeRestriction,ImagePolicyWebhook
- --admission-control-configfile=/etc/kubernetes/epconfig/admission_configuration.json
3. Restart the kubelet.
$ systemctl restart kubelet
$
Question 12: Trivy
Task: Use the Trivy open-source container scanner to detect images with severe vulnerabilities used by Pods in the namespace kamino. Look for images with High or Critical severity vulnerabilities,and delete the Pods that use those images.
Trivy is pre-installed on the cluster master node only; it is not available on the base system or the worker nodes. You will have to connect to the cluster master node to use Trivy.
Solution:
To complete this task using Trivy, the steps involve:
- Listing Pods and their images in the kamino namespace.
- Using Trivy to scan the container images used by the Pods in the kamino namespace.
- Identifying images with High or Critical vulnerabilities.
- Deleting the Pods that use those vulnerable images.
Step 1: List Pods and Their Images in the kamino Namespace
To begin, you’ll need to list the Pods and the images they are using in the kamino namespace.
kubectl get pods -n kamino -o jsonpath='{.items[*].spec.containers[*].image}' | tr -s '[[:space:]]' '\n'
This command will output a list of container images running in the kamino namespace.
Step 2: Use Trivy to Scan the Images for Vulnerabilities
On the cluster master node (where Trivy is installed), scan each image listed from step 1.
ssh k-master1
For each image you found, use Trivy to scan it. Here’s how to scan an image:
trivy image <image-name>
For example, to scan an image like nginx:latest:
trivy image nginx:latest
Step 3: Identify Images with High or Critical Vulnerabilities
After scanning each image, check the Trivy output for vulnerabilities classified as High or Critical. The output will look something like this:
+-----------------------+------------------+-------------------+--------------------------+
| Vulnerability ID      | Package Name      | Severity          | Installed Version         |
+-----------------------+------------------+-------------------+--------------------------+
| CVE-2020-12345        | openssl           | HIGH              | 1.1.1f-1ubuntu2.1         |
| CVE-2020-67890        | curl              | CRITICAL          | 7.68.0-1ubuntu2.4         |
+-----------------------+------------------+-------------------+--------------------------+
If you find any High or Critical vulnerabilities in the scanned image, the next step is to delete the Pod using that image.
Step 4: Delete the Vulnerable Pods or scale down
Once you’ve identified the Pods running the vulnerable images, you can delete them using the following command:
kubectl delete pod <pod-name> -n kamino
If it’s a deployment, just scale down the replicas to 0.
kubectl scale deploy deployment_name --replicas=0 -n kamino
This workflow ensures that Pods running images with severe vulnerabilities are identified and removed from the kamino namespace to improve cluster security.
Question 13: Admission
Context: kubeadm was used to create the cluster in this task.
Task: Reconfigure and restart the cluster Kubernetes APl server to ensure that only authenticated and authorized REST requests are allowed. authorization-mode=Node,RBAC admission-plugins=NodeRestriction. Delete ClusterRoleBinding of user system:anonymous
Solution:
To secure the Kubernetes API server by ensuring that only authenticated and authorized requests are allowed, the following steps need to be completed:
1. Reconfigure the API server to use authorization-mode=Node,RBAC.
2. Enable the NodeRestriction admission plugin.
3. Delete the ClusterRoleBinding of the user system:anonymous to prevent unauthorized access.
Step 1: Reconfigure the API Server
The API server is managed by kubeadm and runs as a static pod on the control plane node. To modify its configuration, you need to edit the kube-apiserver manifest.
1. Edit the kube-apiserver manifest file:
The kube-apiserver manifest is typically located at /etc/kubernetes/manifests/kube-apiserver.yaml. Open this file for editing:
vi /etc/kubernetes/manifests/kube-apiserver.yaml
2. Set the authorization mode:
Ensure that the –authorization-mode flag is set to Node,RBAC. If it is not present, add it under the command section.
- --authorization-mode=Node,RBAC
3. Enable the NodeRestriction admission plugin:
Ensure that the –enable-admission-plugins flag includes NodeRestriction. If the flag doesn’t exist, add it, or if it does exist but doesn’t include NodeRestriction, modify it accordingly.
- --enable-admission-plugins=NodeRestriction
4. Save and exit the file.
Since the API server is running as a static pod, it will automatically restart with the new configuration when the manifest file is saved.
Step 2: Delete the ClusterRoleBinding for system:anonymous
The system:anonymous user allows unauthenticated access to the API server, which is a security risk. You can delete the ClusterRoleBinding that gives permissions to this user.
1. Check for the existence of the system:anonymous ClusterRoleBinding:
Run the following command to list all ClusterRoleBindings and confirm the presence of system:anonymous:
kubectl get clusterrolebindings
2. Delete the ClusterRoleBinding for system:anonymous:
If you find a ClusterRoleBinding for system:anonymous, delete it with the following command:
kubectl delete clusterrolebinding system:anonymous
This will prevent unauthenticated users from making requests to the API server.
Question 14: AppArmor
Context: AppArmor is enabled on the cluster worker node. An AppArmor profile is prepared, but not enforced yet. You may use your browser to open one additional tab to access theAppArmor documentation.
Task: On the cluster worker node, enforce the prepared AppArmor profile located at /etc/apparmor.d/nginx_apparmor. Finally, apply the manifest file and create the pod specified in it.
Solution:
Here are the steps to enforce the AppArmor profile and apply it to the NGINX deployment:
Step 1: Enforce the AppArmor Profile on the Worker Node
1. SSH into the worker node where AppArmor is enabled.
ssh user@worker-node-ip
2. Check if AppArmor is running:
Ensure that AppArmor is active by running:
sudo aa-status
This should display a list of AppArmor profiles and their statuses. If AppArmor is running, you should see profiles in “enforce” or “complain” mode.
3. Enforce the NGINX AppArmor profile:
You can enforce the prepared AppArmor profile by loading it using the following command:
sudo apparmor_parser -r /etc/apparmor.d/nginx_apparmor
The -r flag reloads the profile if it’s already loaded, ensuring the latest configuration is used.
4. Verify the profile is enforced:
You can verify the profile has been loaded in enforce mode by running:
sudo aa-status | grep nginx_apparmor
Step 2: Edit the NGINX Deployment Manifest
Next, you need to edit the nginx-deploy.yaml file to reference the AppArmor profile.
1. Edit the manifest file:
Open the nginx-deploy.yaml file located at /home/candidate/test/nginx-deploy.yaml:
vi /home/candidate/test/nginx-deploy.yaml
2. Apply the AppArmor profile to the Pod:
In the Pod’s securityContext, add an annotation that specifies the AppArmor profile. For example, the following YAML adds the nginx_apparmor profile to the Pod:
apiVersion: apps/v1
kind: Deployment
metadata:
  name: nginx-deployment
  namespace: default
spec:
  replicas: 1
  selector:
    matchLabels:
      app: nginx
  template:
    metadata:
      labels:
        app: nginx
      annotations:
        container.apparmor.security.beta.kubernetes.io/nginx-container: localhost/nginx_apparmor
    spec:
      containers:
      - name: nginx-container
        image: nginx
        ports:
        - containerPort: 80
$ kubectl apply -f /home/candidate/KSSH00401/nginx-deploy.yaml
Question 15: Runtime Security with Falco
Falco is installed with default configuration on node cluster1-node1. Connect using ssh cluster1-node1. Use it to:
1. Find a Pod running image nginx which creates unwanted package management processes inside its container.
2. Find a Pod running image httpd which modifies /etc/passwd.
Save the Falco logs for case 1 under /opt/course/2/falco.log in format:
time-with-nanosconds,container-id,container-name,user-name
No other information should be in any line. Collect the logs for at least 30 seconds.
Afterwards remove the threads (both 1 and 2) by scaling the replicas of the Deployments that control the offending Pods down to 0.
Solution:
Falco, the open-source cloud-native runtime security project, is the de facto Kubernetes threat detection engine.
Use Falco as service
First we can investigate Falco config a little:
➜ ssh cluster1-node1
➜ root@cluster1-node1:~# service falco status
● falco.service - LSB: Falco syscall activity monitoring agent
Loaded: loaded (/etc/init.d/falco; generated)
Active: active (running) since Sat 2020-10-10 06:36:15 UTC; 2h 1min ago
...
➜ root@cluster1-node1:~# cd /etc/falco
➜ root@cluster1-node1:/etc/falco# ls
falco.yaml falco
_
rules.local.yaml falco
_
rules.yaml k8s
_
audit
_
rules.yaml rules.available rules.d
This is the default configuration, if we look into falco.yaml we can see:
# /etc/falco/falco.yaml
...
# Where security notifications should go.
# Multiple outputs can be enabled.
syslog_
output:
enabled: true
...
This means that Falco is writing into syslog, hence we can do:
➜ root@cluster1-node1:~# cat /var/log/syslog | grep falco
Sep 15 08:44:04 ubuntu2004 falco: Falco version 0.29.1 (driver version 17f5df52a7d9ed6bb12d3b1768460def8439936d)
Sep 15 08:44:04 ubuntu2004 falco: Falco initialized with configuration file /etc/falco/falco.yaml
Sep 15 08:44:04 ubuntu2004 falco: Loading rules from file /etc/falco/falco
_
rules.yaml:
...
Yep, quite some action going on in there. Let’s investigate the first offending Pod:
➜ root@cluster1-node1:~# cat /var/log/syslog | grep falco | grep nginx | grep process
Sep 16 06:23:47 ubuntu2004 falco: 06:23:47.376241377: Error Package management process launched in container (user=root
user
_
loginuid=-1 command=apk container
_
id=7a5ea6a080d1 container
_
name=nginx image=docker.io/library/nginx:1.19.2-
alpine)
...
➜ root@cluster1-node1:~# crictl ps -id 7a5ea6a080d1
CONTAINER ID IMAGE NAME ... POD ID
7a5ea6a080d1b 6f715d38cfe0e nginx ... 7a864406b9794
root@cluster1-node1:~# crictl pods -id 7a864406b9794
POD ID ... NAME NAMESPACE ...
7a864406b9794 ... webapi-6cfddcd6f4-ftxg4 team-blue ...
First Pod is webapi-6cfddcd6f4-ftxg4 in Namespace team-blue.
➜ root@cluster1-node1:~# cat /var/log/syslog | grep falco | grep httpd | grep passwd
Sep 16 06:23:48 ubuntu2004 falco: 06:23:48.830962378: Error File below /etc opened for writing (user=root
user
_
loginuid=-1 command=sed -i $d /etc/passwd parent=sh pcmdline=sh -c echo hacker >> /etc/passwd; sed -i '$d'
/etc/passwd; true file=/etc/passwdngFmAl program=sed gparent=<NA> ggparent=<NA> gggparent=<NA>
container
_
id=b1339d5cc2de image=docker.io/library/httpd)
➜ root@cluster1-node1:~# crictl ps -id b1339d5cc2de
CONTAINER ID IMAGE NAME ... POD ID
b1339d5cc2dee f6b40f9f8ad71 httpd ... 595af943c3245
root@cluster1-node1:~# crictl pods -id 595af943c3245
POD ID ... NAME NAMESPACE ...
595af943c3245 ... rating-service-68cbdf7b7-v2p6g team-purple ...
Second Pod is rating-service-68cbdf7b7-v2p6g in Namespace team-purple.
Eliminate offending Pods
The logs from before should allow us to find and “eliminate” the offending Pods:
➜ k get pod -A | grep webapi
team-blue webapi-6cfddcd6f4-ftxg4 1/1 Running
➜ k -n team-blue scale deploy webapi --replicas 0
deployment.apps/webapi scaled
➜ k get pod -A | grep rating-service
team-purple rating-service-68cbdf7b7-v2p6g 1/1 Running
➜ k -n team-purple scale deploy rating-service --replicas 0
deployment.apps/rating-service scaled
➜ root@cluster1-node1:/etc/falco# falco | grep "Package management"
06:38:28.077150666: Error Package management process launched in container 06:38:28.077150666,090aad374a0a,nginx,root
06:38:33.058263010: Error Package management process launched in container 06:38:33.058263010,090aad374a0a,nginx,root
06:38:38.068693625: Error Package management process launched in container 06:38:38.068693625,090aad374a0a,nginx,root
06:38:43.066159360: Error Package management process launched in container 06:38:43.066159360,090aad374a0a,nginx,root
06:38:48.059792139: Error Package management process launched in container 06:38:48.059792139,090aad374a0a,nginx,root
06:38:53.063328933: Error Package management process launched in container 06:38:53.063328933,090aad374a0a,nginx,root
This looks much better. Copy&paste the output into file /opt/course/2/falco.log on your main terminal. The content should be cleaned
like this:
# /opt/course/2/falco.log
06:38:28.077150666,090aad374a0a,nginx,root
06:38:33.058263010,090aad374a0a,nginx,root
06:38:38.068693625,090aad374a0a,nginx,root
06:38:43.066159360,090aad374a0a,nginx,root
06:38:48.059792139,090aad374a0a,nginx,root
06:38:53.063328933,090aad374a0a,nginx,root
06:38:58.070912841,090aad374a0a,nginx,root
06:39:03.069592140,090aad374a0a,nginx,root
06:39:08.064805371,090aad374a0a,nginx,root
06:39:13.078109098,090aad374a0a,nginx,root
06:39:18.065077287,090aad374a0a,nginx,root
06:39:23.061012151,090aad374a0a,nginx,root