BDRSuite v5.2 is generally available now. BRDSuite v5.2 includes multiple features including restoring the VMware VMs, Hyper-V VMs, Windows Servers & Windows Workstations backups to Microsoft Azure. It also brings On-demand backup scheduling for Microsoft 365 backups, User-level backup report for Microsoft-365, and On-demand backup scheduling for Google Workspace backups. This article will walk you through how to restore the VM to azure quickly using BDRSuite.
BDR Proxy for Azure
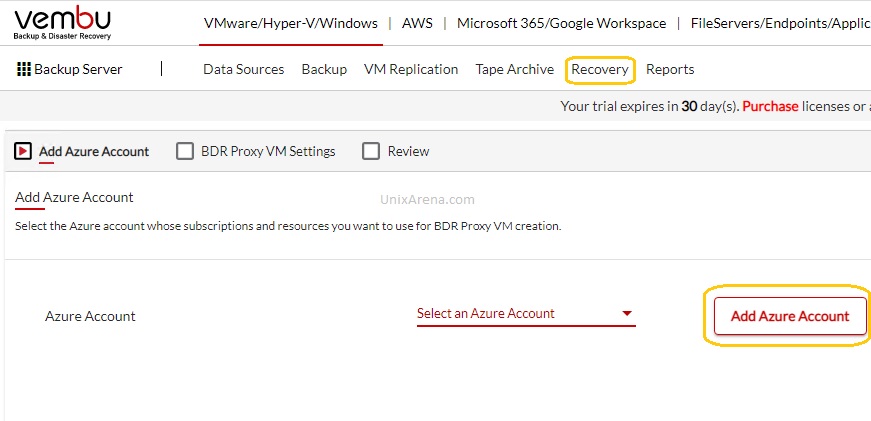
Recovery to Azure is used to restore and boot VMs/Physical machines from the Vembu BDR Backup Server to Microsoft Azure. You can create and manage BDR Proxy VM(s) from here. Note: Make sure the BDRSuite Server has the following: a) Windows Management Framework 5.1 b) .NET 4.7.2 & above and c) Internet Connectivity (Web/HTTP(s) Proxy is not supported).
- On the Azure Portal, create an application for BDRSuite and assign the ‘Owner’ role for it. Note: Any existing applications with the ‘Owner’ role for the subscription that you plan to use in BDRSuite can also be used.
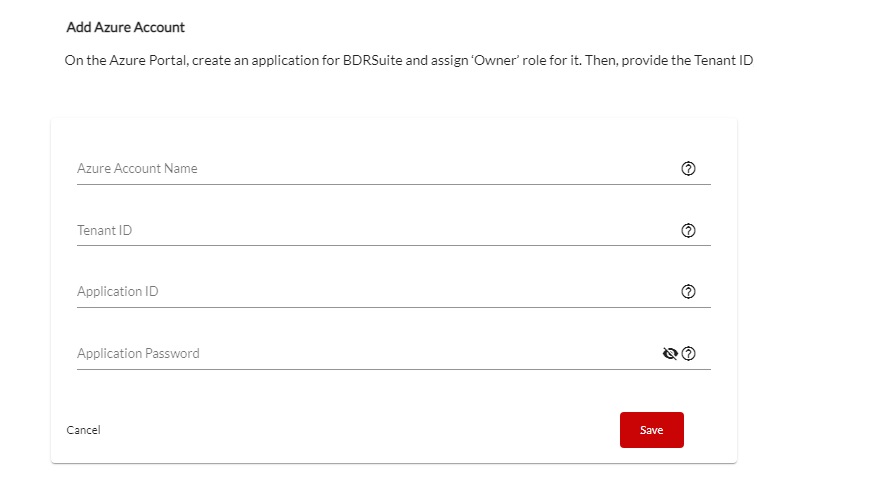
- On the BDRSuite, provide the Tenant ID, generated application details: Application ID & Application Password, and save your Azure Account.
- You can then select the added Azure account and use its subscriptions & resources to restore the backed up Hosts/VMs as Azure VMs.

Step 1: Create application ID
- Sign in to your Azure Account through the Azure Portal
- Note: Make sure the user account you use has sufficient permissions to register an application and assign a role to it.
- Search and locate the Azure Active Directory. On the Active Directory page, select App registrations under Manage on the left pane and click on New registration.
- Then ‘Register an application’ page will appear and enter the following details to register your application.
- Name – Enter a display name for the application.
- Supported account types – Choose the option “Accounts in this organizational directory only”
- Finally, click on the Register button. The Azure AD assigns a unique Application (client) ID, which appears on the page to which you are redirected.
Step 2: Generate Application Password
- Select Certificates & secrets under Manage on the left pane.
- Click on New client secret which opens a separate section: Add a client secret. On this page, choose 24 months from the Expires option and click Add. This will generate and display the application password (under the ‘Value’ column).
Note:
- Make sure you copy the application password (Value) as the portal will display it only once. (You can use the copy to clipboard icon to copy the password).
- Once the generated application password has expired, create a new client secret and update the application password on the BDRSuite.
Step 3: Assign ‘Owner’ Role for the Application
- On the Home page, under the Azure Services section, select ‘Subscriptions’ (or) search for and select ‘Subscriptions’ from the Search box at the top.
- From the list of subscriptions, click on the subscription that you plan to use in BDRSuite.
- On the left pane of the selected subscription page, click Access control (IAM) and then click Add -> Add role assignment at the top.
- On the Add role assignment page:
- On the Roles Tab, Select Owner role and click Next.
- On the Members Tab:
- For the field: ‘Assign access to’, select the option: User, group, or service principal.
- For the field: Members, click ‘Select Members’ which opens a dialog box. Search and select the application that you have created (in step 1) and click the ‘Select’ button. Then, click the Next button.
- On the Review + assign tab, review the role assignment settings and click the Review + assign button.
Step 4: Add Azure Account on the BDRSuite
- On the BDRSuite, navigate to the Backup Server Tile -> Credential Management -> Azure Accounts page.
- Click on the ‘Add Azure Account’ button which opens a dialog box. Then, enter the following details and click ‘Save’.
- Tenant ID – On the Azure Portal, navigate to the Azure Active Directory page where you can find the ‘Tenant ID’ under the Basic information section.
- Application ID – On the Azure Portal, navigate to the Azure Active Directory page and select ‘App registrations’ from the left pane. Click on the application that you have created (in step 1) and you can find the ‘Application (client) ID’ under the Essentials section.
- Application Password – Provide the Application Password (Value) that you copied after creating the client secret.

Once the azure account is successfully added, you can able to restore the existing backed up VM from the BDRsuite can be restored it in Azure.
To know more information about BDRSuite v5.2, please look at the release notes.
Conclusion:
Overall vembu BDRSuite v5.2 is a robust backup and DR software for both ONPREM and Cloud environments. This latest version adds another feather by introducing ONPREM & AWS VM recovery on Azure. Download BDRSuite v5.2 for free and test it in your environment today.
Leave a Reply